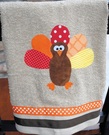
Turkey hand towels
What You Need:
Hand Towels or Dish Towels (mine came in a 2 pack at Target for like $3 or $4)
Scraps of fabric in Fall colors-red, yellow, orange, brown
Heat ‘n’ Bond
Ribbon (optional)
First print and cut out the pattern pieces bellow.
Next, using the pattern pieces, cut out your fabric. You will need 1 body and about 5 feathers (you can certainly do more or less, that’s up to you). Also, 2 feet, 2 eyes and 2 eyeballs and a beak.
Now, cut out the same things but in the Heat ‘n’ Bond this time.
With your iron, adhere the fabric pieces to the Heat ‘n’ Bond pieces. Peel off the paper backing.
Place your feathers where you want them on your towel and iron them in place. Then place the body where you want it and iron it in place. Same thing with the eyes and beak and feet. Make sure everything is adhered very well.
| turkeypattern.pdf |
Turkey place cards
Materials:
Step 1: Paint all the Styrofoam balls. To assist with the painting, stick a toothpick into the balls and hold the toothpick to paint. Once finished, set aside to dry.
Step 2: While you’re waiting for the paint to dry, cut your paper into 3 to 5 circles in progressively larger sizes for the tail feathers, 2 small circles for the eyes, 2 small elliptical shapes for the wattle, and 1 small triangle for the beak. I used decorative craft scissors for the tail feather pieces to give the circles a scalloped edge, but you can also cut diagonal shapes into the edges by hand or just keep it simple with plain circles.
Step 3: Cut your circular tail feather pieces about three-quarters of the way down each piece. Use a glue stick to glue the pieces together, with the smallest piece on top. Make sure all of the edges are aligned at the bottom.
Step 4: Once your Styrofoam has dried, use a serrated knife to make a 1″ deep cut into the larger ball about three-quarters of the way back.
Step 5: Apply a little hot glue to the bottom of the paper tail feather piece and stick it into the cut in your Styrofoam.
Step 6: Hot-glue the beak, wattle, and eyes to your small Styrofoam ball. Then stick a toothpick into both balls to join them together.
Step 7: Double up pipe cleaners, twist them together to make the legs, then form small loops at the ends for talons. Stick them into the bottom of the larger ball. To keep the turkey from falling over, avoid making the legs too long. If you’re having trouble standing the turkey, you can also hot-glue the talons to a decorative piece of paper to give it a bit more balance.
Step 8: Print out my Thanksgiving place card template and create tags for each of your guests. Finally, wedge each tag into the Styrofoam just below the beak.
http://ideas.evite.com/diy/thanksgiving-diy-turkey-place-cards/
- Styrofoam balls: one 1 x 2″ and one 1 x 1″ ball for each place card
- Toothpicks
- Red craft paint (not spray paint — most spray paints deteriorate Styrofoam)
- Paintbrush
- Assortment of paper in fall colors
- Scissors
- Decorative scissors (optional)
- Glue stick
- Serrated knife
- Hot glue
- Brown pipe cleaners
Step 1: Paint all the Styrofoam balls. To assist with the painting, stick a toothpick into the balls and hold the toothpick to paint. Once finished, set aside to dry.
Step 2: While you’re waiting for the paint to dry, cut your paper into 3 to 5 circles in progressively larger sizes for the tail feathers, 2 small circles for the eyes, 2 small elliptical shapes for the wattle, and 1 small triangle for the beak. I used decorative craft scissors for the tail feather pieces to give the circles a scalloped edge, but you can also cut diagonal shapes into the edges by hand or just keep it simple with plain circles.
Step 3: Cut your circular tail feather pieces about three-quarters of the way down each piece. Use a glue stick to glue the pieces together, with the smallest piece on top. Make sure all of the edges are aligned at the bottom.
Step 4: Once your Styrofoam has dried, use a serrated knife to make a 1″ deep cut into the larger ball about three-quarters of the way back.
Step 5: Apply a little hot glue to the bottom of the paper tail feather piece and stick it into the cut in your Styrofoam.
Step 6: Hot-glue the beak, wattle, and eyes to your small Styrofoam ball. Then stick a toothpick into both balls to join them together.
Step 7: Double up pipe cleaners, twist them together to make the legs, then form small loops at the ends for talons. Stick them into the bottom of the larger ball. To keep the turkey from falling over, avoid making the legs too long. If you’re having trouble standing the turkey, you can also hot-glue the talons to a decorative piece of paper to give it a bit more balance.
Step 8: Print out my Thanksgiving place card template and create tags for each of your guests. Finally, wedge each tag into the Styrofoam just below the beak.
http://ideas.evite.com/diy/thanksgiving-diy-turkey-place-cards/
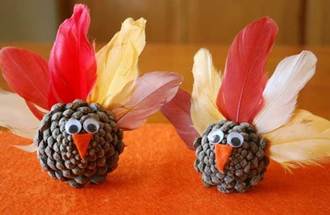
Pinecone turkey decorations
Materials
- pinecones
- super glue
- scissors
- orange felt
- feathers
- eyes
